Diy How to Make a Cardboard Drawer Organizer Hd
Part-time and freelance writer with plenty of tips for DIY projects.

Folks love living in lofts and working in open-plan offices. The barrier-free lifestyle has its advantages; however, sometimes, a fella needs a little privacy.
When I was living in a loft apartment, I salvaged a pile of heavy-walled (approximately 3⁄16"-thick) cardboard tubes from the centers of rolls of plotter paper and made screens to section off the bedroom.
The screens are made with tubes suspended horizontally inside wooden frames, creating panels of varying transparency. Joined with some scavenged door hinges, the panels are self-supporting. In my case, six panels, totaling over 18 linear feet, were enough to wall off the bedroom within the loft. The spaces between tubes make for a convenient clothes-drying rack and impromptu closet.
Materials Required:
• Four 6-foot 2×4s, "select" or "prime" grade
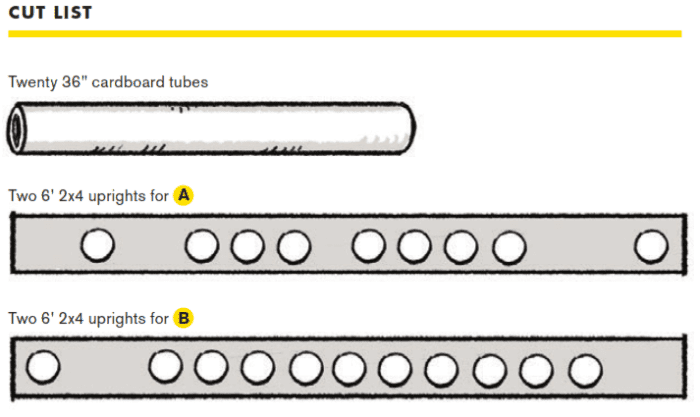
• Twenty cardboard tubes, approximately 2½" diameter × 36" long
• Wood glue
• One 1-pound box 1¼" drywall screws
• Sandpaper
• Three heavy-duty door hinges
• Pencil
• Tape measure
• Speed Square
• Drill (corded, heavy-duty drill recommended)
• 2 ½" hole saw (must match cardboard tube diameter)
Read More From Dengarden
• Mallet
• Clamps (optional)
• Countersink bit
• Impact driver
How to Construct the Screen
Step 1:
Lay both 2×4 pieces of lumber. Mark the centrelines, lengthwise, on each piece by running a Speed Square down the side of the board with a pencil held in the 1¾" mark. Mark the centers of each tube socket along the centrelines.
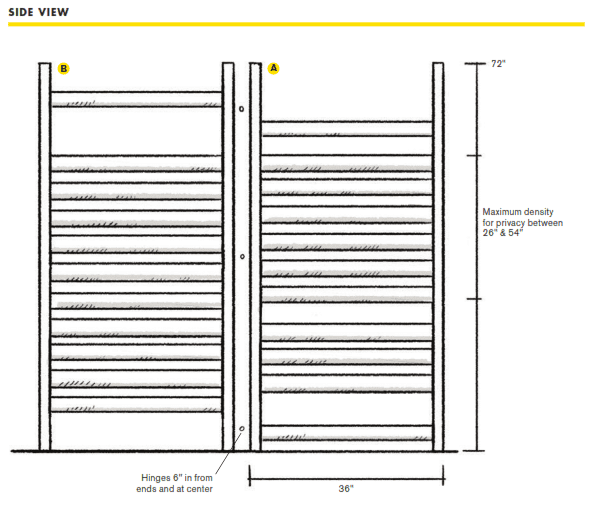
You can space the tubes (eight per panel) as desired; just make sure to leave at least ¾" between tubes (3¼" on center for 2½" dia. tubes), as closer spacing might split the wood. Using higher-grade lumber ("select" or "prime") for the uprights will also help prevent splitting. For a privacy screen, concentrate the maximum density of tubes between 26" and 54" from the ground. Repeat for the second pair of 2×4s, changing the pattern if desired.
See Cut List below.
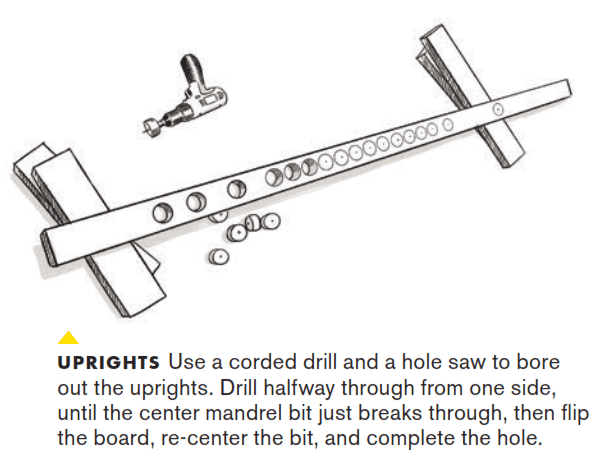
Step 2:
Drill out each center mark with the hole saw (see below). Put the 2×4 on a sacrificial surface to protect the hole saw and prevent tear-out on the backside of the 2×4. Another strategy to prevent tear-out is to drill halfway through from one side, until the center mandrel bit just penetrates the backside of the wood, then flip and drill the rest of the material out of all the holes from the backside. Using a hole saw can strain even powerful drills so take care to let the drill and bit cool down periodically.
Step 3:
Sand the edges of the holes, removing rough edges, and lightly bevelling the edges to help the tube's seat (it's a very tight fit).
Step 4:
Assemble each screen panel by laying one 2×4 upright flat on the ground. Put a little wood glue in each socket and insert the end of the tube, using a mallet and a block to persuade the stubborn ones. Once all the tubes are socketed into one side, put glue on the free ends of the tubes and put the matching upright on top, hammering it into place until all the tubes are firmly seated into the sockets on the top board. A second set of hands is beneficial here, as each tube seems to have a mind of its own.
Step 5:
Clamp the boards to one another, if necessary, to draw them together and seat the tubes. Pin the tubes to the frame with screws (one in every other tube is fine) through the narrow edge of the uprights and into the sidewalls of the tubes, again pre-drilling and going slowly to prevent splitting. Let the glue dry completely.
Step 6:
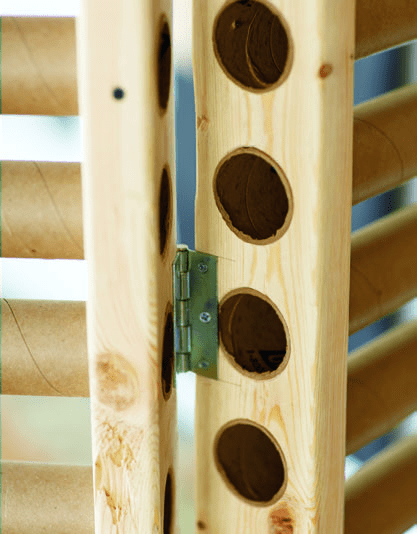
Join the panels with three hinges, following the spacing shown below.
This content is accurate and true to the best of the author's knowledge and is not meant to substitute for formal and individualized advice from a qualified professional.
Fairus Mohd Aziz (author) from Malaysia on September 17, 2019:
Thank you RTalloni
RTalloni on September 17, 2019:
What a cool project. Thanks for sharing the clear tutorial.
Diy How to Make a Cardboard Drawer Organizer Hd
Source: https://dengarden.com/interior-design/DIY-Cardboard-Tube-Screens
0 Response to "Diy How to Make a Cardboard Drawer Organizer Hd"
Post a Comment