Pictures of Different Types of Water Transportation
Dan has been in the HVAC industry for 23 years with experience ranging from installation and service to sales and distribution.
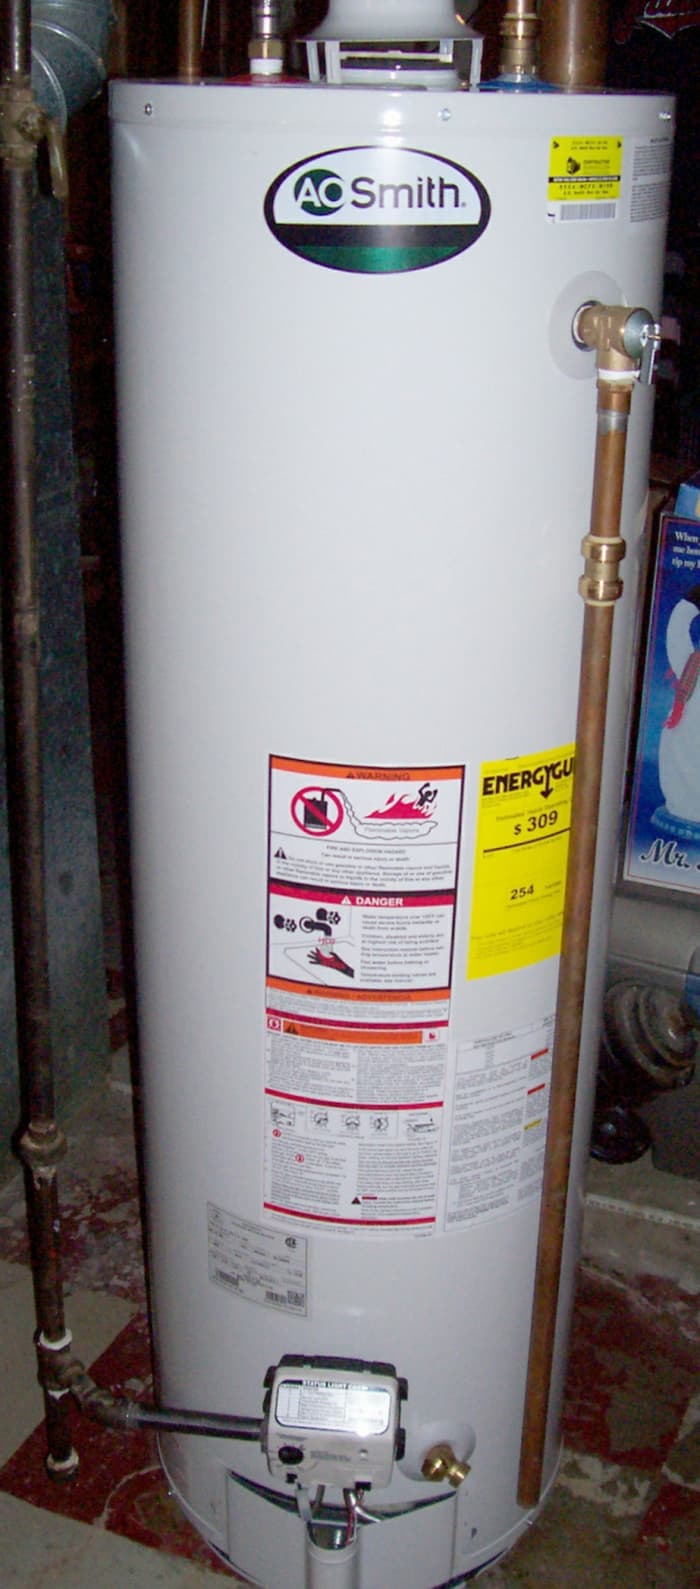
New hot water heater—ain't she a beauty?
Cre8tor
Water Heater Installation Guide
Replacing your hot water tank can be a costly venture. Having someone provide this service for you can cost between $800 and $1,000 for a standard, gas burning, 40 or 50-gallon hot water heater, and that's if it goes out Monday through Friday from 8 am to 5 pm.
The days of buying a new water tank for $150 are gone and having it installed for less than a couple hundred dollars . . . gone with it. So how can you afford to get this done and take a nice hot shower without crying the "I'm Broke Blues" in the process? Well, perhaps this will help.
The following is a sort of documentary of my recent water heater replacement chore. Once you've seen what I've done here and picked up on the materials that are available to you to make it simple, you too could choose to do it yourself. Relive the old days by learning how you can replace your own water heater for about $400 and a few hours of work.
| Tools | Parts | Supplies |
|---|---|---|
| Hose | New Water Heater | Towel |
| Tubing Cutter | Pipe Fittings (water) | Teflon Tape |
| 2 Pipe Wrenches | Small Piece of Pipe (water) | Pipe Dope |
| Tape Measure | Valves (gas or water if applicable) | Leak Test Solution (dishsoap) |
Step 1: Drain Your Old Water Heater
First things first—let's get this old beater water heater drained so we can get it cut loose and out of here. I don't know about you, but after new parts, band-aiding, and finally leaking all over my floor, I'm ready to see her go.
Draining the water heater is easy but be sure to get it started first since it will take a while to drain off, and no one wants to carry a water heater up a flight of stairs while there's still water in it. It makes it heavy and will more than likely create a mess along the way.
Understand that when reading about draining your heater, that's where we stop. We're only draining it so we can remove it, and no flushing or refilling is necessary. Just get it drained and stop.
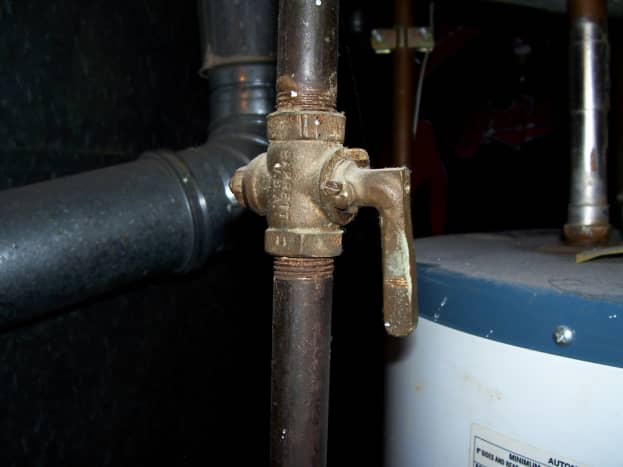
This valve is on. When the handle is sideways to the line, it is off.
Step 2: Shut Off the Gas and Remove the Flue
Now that you've read up on how to drain your water heater, be sure the gas is turned off at the valve, not just at the control module. We will soon be disconnecting the gas line, so we certainly want to make sure it is off at the valve. This is very simple. Just turn the gas valve a quarter turn so that the handle is parallel to the gas line. Just remember that in doing this, the gas is still waiting on one side of the valve though it is off on the other.
As for the flue, it's got to come off too. The flue, or chimney, is reusable as long as it's intact and not rusting through. Take it off by removing the screws that are holding it to the draft hood and those holding it to the remaining chimney. Again, this is quite simple, and you really only need to be careful with the adjustable joints in the flue so that they don't break apart if you twist too hard or in the wrong direction since they may have grown a bit stiff over the years.
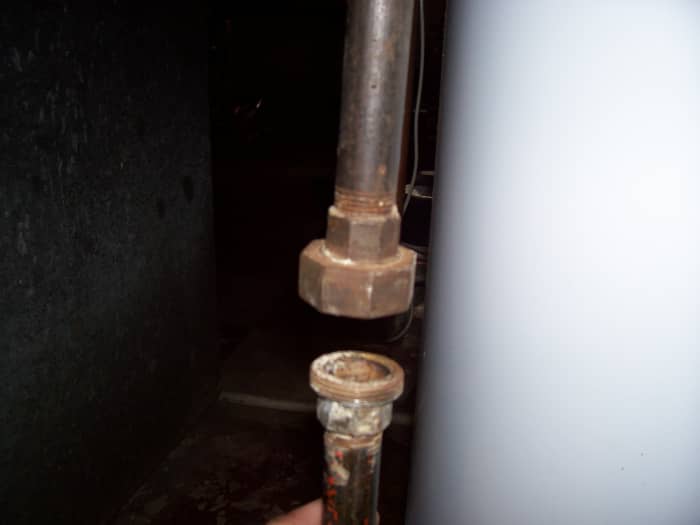
You can see here what the union looks like when taken apart. The union is considered one part though it is actually made up of 3 parts.
Cre8tor
Step 3: Disconnecting the Gas Line
Okay, so this is the part that everyone freaks out about, and with good reason. Gas is explosive, and that seems to bother people. I get it, but honestly, electricity is scarier if you ask me, and I've worked with both regularly for many years. You see, gas warns you if something is wrong. It will hiss, and it will stink, both letting you know that something is not right. Before we move on, just pay attention with your eyes, nose, and ears as you do this part.
Loosen the line slowly so that you can stop immediately and begin to tighten it back up should you hear hissing from the line. This would mean that somehow, you had forgotten to shut it off or shut it off completely. If you unscrew it fast, you risk the line coming apart completely before realizing there is a problem. Trust me; if you're paying attention, you're not likely to have any problems. One last thing . . . be sure there are no open flames around where you're working. Did I really need to say that? Yes, yes, I did.
Okay, so we disconnect the line at what is called the union. The union will be located between the main valve and where it connects to the water heater. It is a fitting that allows the line to be joined to a stationary object. Otherwise, you would reach a point where you'll need to screw the line into the heater, and as you do, it will unscrew from the last piece you connected. You place one pipe wrench on the big nut, pulling left to right, and one on the smaller nut below, pulling right to left. This will "break" open the union allowing it to be split in half.
Once the union is open, take the remaining gas line off of the old tank. So long as this pipe is in good condition, you will use it to connect to your new water tank. Many times, the new tank and the old tank will line right back up. If not, miscellaneous gas fittings can be purchased at just about any hardware or home improvement store.
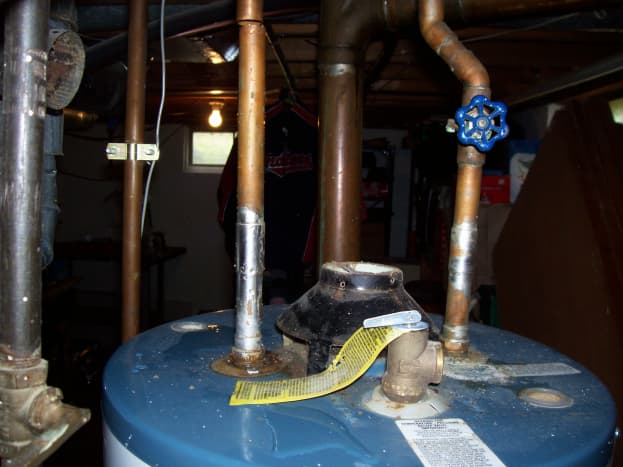


Here you can see the set up I started with. I will cut the cold side just a couple inches below the valve. You can also see that my T & P valve was on top.
Step 4: Cut the Tank Loose From the Water Lines
Okay, the last thing we need to do before taking this piece of junk to the scrap heap is cut it loose from the water lines. On the hot water side, we don't really have much to worry about in the way of where we cut the line. The water from this side of the tank is off and emptied so we won't have any real mess to speak of.
Your only real consideration here is how much you'll have to do to reconnect it. This is definitely a "less is more" scenario. If at all possible, we'd like to just go up a few inches off the tank and cut so that we can use as little material as possible connecting our new tank.
As for the cold water side, if you have a shut-off valve that is in good shape, you'll want to cut below that so that you can keep the water on to the rest of the house, and if not, you'll have to shut off the water at the main, and I suggest installing a new valve while you have this all opened up.
Cutting Copper
Use a copper tubing cutter to cut your water lines. It's important not to go too fast, meaning you snug it up to the line, go around a couple of times, then tighten again, then go around a couple of times, then tighten, and so on. Don't tighten down too fast, or you will "oval" out the pipe, and your new ROUND fittings won't fit.
Read More From Dengarden
Break Time . . .
Okay, a couple of little things here before we get started putting our new tank in that I think will give you a "heads up" and maybe save you a couple of dollars too.
First, your new tank will come with a new T & P valve that is made for your tank so we don't need the old one but we will want to try to salvage our run-off tube that is hooked to the old T & P. If the old and new tank had the T & P hooked into the side of the tank, you should just be able to remove and re-install the tube.
If it was on top of the old tank, like mine, and will be on the side of the new tank, you can make 2 cuts on the tube, one on the vertical drop and one on the horizontal run. Doing this will allow you to "couple" the line back together, cut it to length, and reuse it on the new tank instead of buying another one.
Also, since you're likely cracking open your new tank, don't throw away any paperwork. You're going to have to register your warranty, and you may even want to take the sticker off the box that has the model and serial number stamped on it and tape it to your paperwork, so it's convenient if you ever need it for warranty parts.
Lastly, clean up the area. Clean where you're new tank will sit since you won't have access to this spot again for some time, and once the new tank goes in, it could be hard to tell if you have new water messes or old water messes when you're testing the connections and such for your new tank. A clean slate will help to detect any issues before "sticking a fork in" this project.
Now, the rest of the family would like to have hot water again sometime today so . . . back to work!
Step 5: Installing Our New Hot Water Heater
Installing our water heater is really as easy as reversing everything we just did. We need to put the new water tank in place being sure that the hot and cold water sides are properly lined up with the plumbing as it was before. Not everything has to be in the perfect place as you will have some room for adjustment as you go but let's get it pretty close here. I suggest reconnecting in the following order.
- Hook up the cold water line.
- Hook up the hot water line.
- Start to fill the tank while also inspecting your new connections for leaks.
- Hook up the gas line.
- Hook up the flue.
- Hook up the run-off tube.
- Relight the pilot light and turn the tank on.
Since everyone will have a unique situation in reconnecting their water heater, let me just offer you some tips and lists that will help you to determine your best approach.
Is Your New Tank Leaving Water on the Floor?
It's not uncommon for a new tank to leave some dampness on the floor when it's first being used. This is because there is an insulated lining between the tank and the outer shell that can gather humidity while in storage waiting to be sold.
Now when you heat it up, that trapped moisture will condensate, run to the bottom of the tank and onto the floor. Give it a day. If you still see water down there, then you may have a problem. Now, I'm not talking about a running river here. If you have that much water, there is definitely a problem, but if it's just a smaller amount, I wouldn't panic. It will likely be gone tomorrow.
Pipe Sizing
Though much of your house is likely ran in 1/2" piping, where it connects to your water heater is likely 3/4" piping. This is true for most residential water heaters. At least those that are between 40 and 50 gallons.
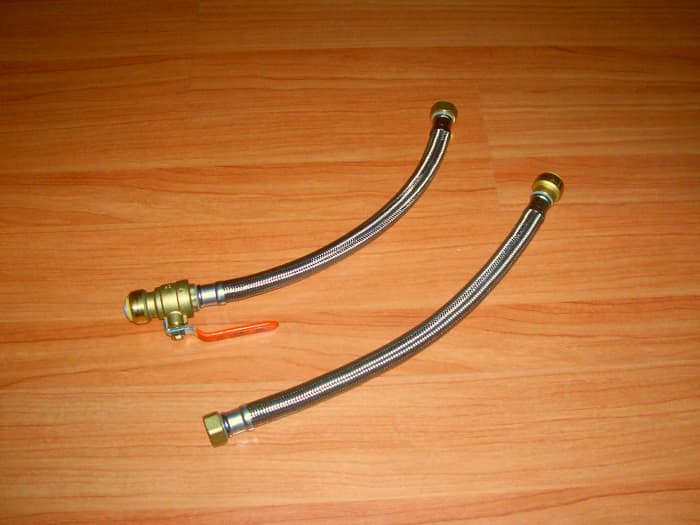
Here are a couple of flexible, braided hose connections. Threaded on one side for the water heater and push fit on the other. Notice one has the valve built in if needed.
Cre8tor
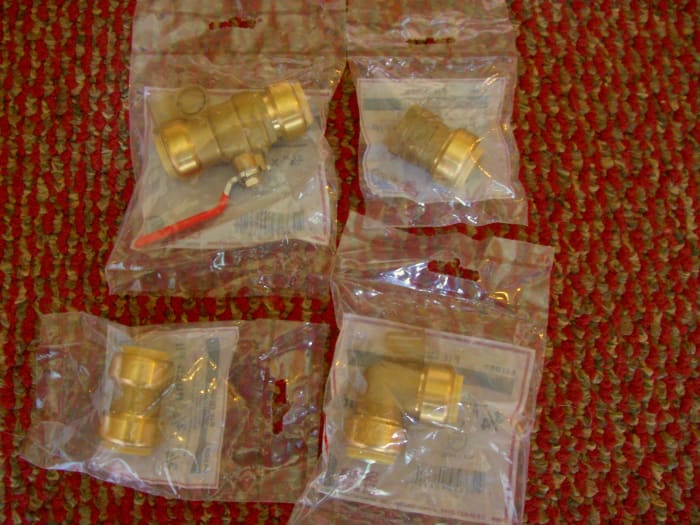
Here you have a push fit valve (top left), coupling (bottom left), elbow (bottom right) and adapter (top right).
Cre8tor
Plumbing Is Easy With Push, Threaded, and Compression Fittings
Many people have avoided plumbing for the reason of having to "sweat" or solder copper fittings. Well, let me introduce you to the push fitting (a.k.a. SharkBites).
Push fittings couldn't have made plumbing any easier. You simply push the fitting onto the pipe, and "voila," you're done. You can even remove the fitting with a special, very inexpensive tool made by the manufacturer. You simply slide the tool onto the pipe, push it against the end of the fitting, wiggle and . . . you guessed it, "voila." It's off again.
These fittings can even be turned or rotated once they're installed so you don't even have to be perfectly straight right away when say, making sure the handle of a valve is in front. Go ahead, put it on backward . . . it's okay. Once in place, just spin it into where you want it, and "voila," you're a pro.
These fittings are nearly as good as an invention as running water itself. You may have heard otherwise, but I have used these all over my home and have yet to have a problem. I don't suggest using them in areas that are inaccessible simply because the oldest one I have is 7 years, and though it's holding up fine, these haven't been around long enough to say what they'll do in 20. That said, for our purposes here . . . it's a no-brainer. They are a bit more expensive but worth every penny as far as I'm concerned. Just place the insert in the pipe and listen for the click, click.
As for compression and threaded fittings . . . these are just fittings that you wrench onto the water tank. Again, really simple and no soldering. Just put a little Teflon tape on the nipple, hand tighten them down, put a wrench on it to snug it up, and yep, "voila." (nipple: a piece of pipe that is usually threaded on both ends)
One last thing, and then I'll let the pictures do the talking. You'll hear the term "dielectric" be thrown around when talking about water tank installation. In short, a dielectric nipple or union are needed because copper reacts chemically with certain metals. In this case, the metal your water heater is made of. This reaction causes corrosion and ruins the integrity of the copper, in turn giving you leaks.
Almost every water heater today has dielectric nipples mounted on the unit already and if you use the braided Sharkbite lines shown in the picture above, you won't need a dielectric union either, as they have it built right on the hose. I use these on about every job nowadays.
How to Hook Up Gas Line
When reconnecting your gas line, work from the control valve on the water heater back to the union where you took it apart. This way, when you get to the union, you can connect the 2 lines without the parts unscrewing from each other.
Once you've gotten to the union, line it up, begin to hand tighten, and then put your 2 wrenches on it as you did when you took it apart. One on the big nut, one on the smaller nut below, and turn them in opposite directions until snug. This should complete your gas line hook-up. Here are a couple of other things you need to know about running gas line.
- Never over-tighten. Snugged up is good.
- Make sure you keep a wrench on the piece your attaching to for opposite pressure. This way, as you put on new pieces, you don't add tension down the line. This is especially important near the valve because too much pressure on the valve could damage your new water heater.
- Use "pipe dope." Pipe dope is a putty-like substance that seals the connections. Use the small brush to apply the dope to the "male" side of the connection only before installing.
- No fires!
- Leak check. Once you turn the gas back on, leak check it by using either a store-bought leak detector solution or even a thin application of dish soap. If it bubbles up on you, you have a leak and need to shut the valve again until the leak is repaired. I like this Camco Leak Detector Spray. It makes even minor leaks very obvious—great for peace of mind.
- Bleed the line. Now that you've opened the gas line, air has gotten in there and needs to be removed. You should bleed the line at the "dirt leg." (See terms) You do this once all the gas line is connected.
- Remove the cap from the dirt leg and apply the pipe dope to the nipple.
- Screw the cap on just barely hand tight.
- Turn the gas on.
- Loosen the cap just a bit so that you hear a slight hiss.
- Wait a few seconds letting the gas push the air out, and then tighten the cap completely.
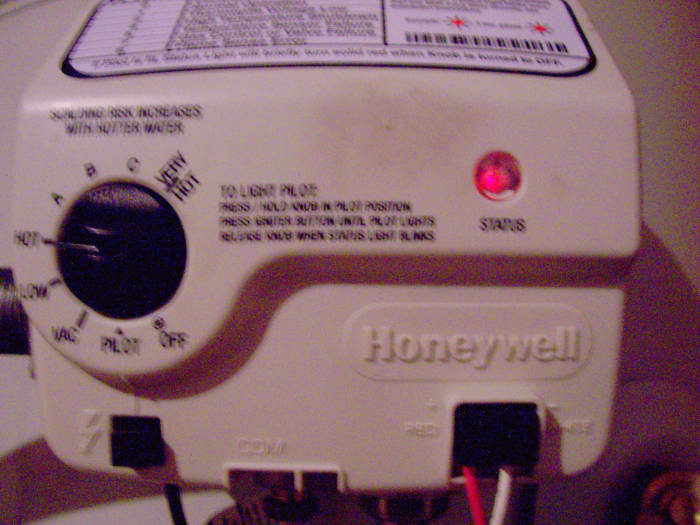
This blinking red light on your control module can help you determine problems with your water heater based on the code chart above it.
Cre8tor
Finishing Up Your Hot Water Tank Installation
You still have your flue to hook up, but this might be the simplest part of it all. Just slide it back into place at the chimney connection and lower it down onto the draft hood that you've been provided with your tank. As long as you're installing a similar water heater to the one you've just removed, these should line right back up. Put the screws back in and . . . "ta-da" (gotcha)
At this point, now that you've read up on draining your water heater, you know how to fill up your water heater as well. Without further ado, and with the tank filled up, let's get the show back on the road by lighting up our water heater and watching as it works for the first time. By now, you've inspected for leaks but keep watching.
As our tank heats up and the pressure is stabilizing, leaks that weren't there before can begin to show themselves. So long as all is well, you should have hot water in no time. With some of the newer units, you may even have an LED light to tell you all is well on the control module.
Helpful Photos and Information for Installing a New Gas Hot Water Tank
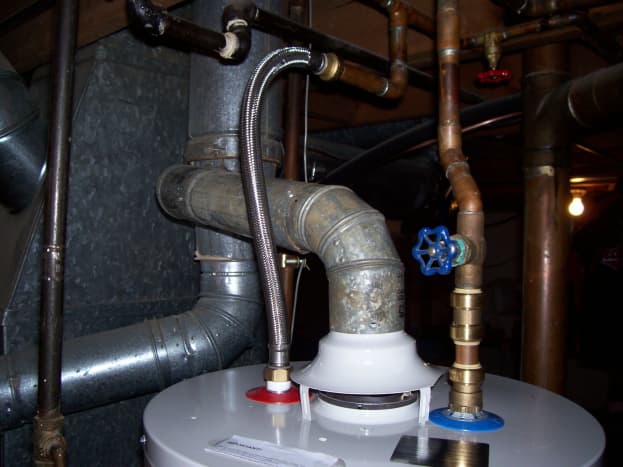
Here is the finished product on the top side. You can see where my new plumbing hooks into my old plumbing and the products and fittings I chose to use. This photo sums up a lot of this article. Notice I was able to reuse the same flue parts.
Test Your Water Heater Knowledge
For each question, choose the best answer. The answer key is below.
- How often should you flush your water heater?
- Once a year
- Once every 5 years
- Once every 10 years
- You're supposed to flush that thing?
- This piece can help extend the life of your water heater greatly.
- Jumper Cables
- Control Module
- Anode Rod
- Flibber Jibbit
- What is pipe dope used for?
- Smoking
- Help solder spread evenly
- Seal gas line joints
- Help water to drain
- What does the T & P stand for in a T & P relief valve?
- Thomas Price
- Temperature and Pilot
- Thermal Positioning
- Temperature and Pressure
Answer Key
- Once a year
- Anode Rod
- Seal gas line joints
- Temperature and Pressure
Remember: Safety First
I hope this information has been helpful and the pictures useful in helping understand the parts and terminology being used. The work isn't rocket science, maybe not even as hard as the reading. I just want to be as clear as possible, covering as many aspects of the task as possible.
As always, never assume or guess at anything when working with your household appliances. Especially those that are gas burning or use electricity. These tasks are to be done carefully and with the understanding that there is risk involved. My aim is to help you, not put you in harm's way. If you are not confident in performing these tasks, don't. Contact a professional to do this for you and feel better knowing what it is he's up to.
Happy home-owning!
This article is accurate and true to the best of the author's knowledge. Content is for informational or entertainment purposes only and does not substitute for personal counsel or professional advice in business, financial, legal, or technical matters.
Questions & Answers
Question: Do I have to have an air vent or can the exhaust pipe sit on top of the water heater?
Answer: I believe you're referring to the draft hood and yes, you need that.
© 2012 Dan Reed
Tim on February 16, 2019:
Me and buddy are having problems attaching hit water line from heater to shower it keeps coming off at shower
Dan Reed (author) on May 25, 2018:
Chase - Thank you for your comments. I do enjoy getting these from time to time from those who are upset by my teaching people how to do for themselves. Surely you're aware that the connection on the draft hood is 3" OR 4" venting as stated in the manual and since I'm well under max length per the venting tables that came with the unit, my chimney is centered in the home, and is B-Vent top to bottom, 3" was just fine. Also, while 12" vertical is recommended, it is not mandatory and since I have a short ceiling, there is no way to meet that even with a lowboy which, I'm sure you know, has been increased in size due to the last set of EPA regulations. Since the gas cock is free turning and leak free there was no reason to change it and since I don't have to drink from it, I'm not concerned with lead content either. Lastly, I've maintained a 1/4" per foot rise and since a wye would have compromised that pitch and the pitch of the furnace (which puts out twice as many BTU thus is far more important) I chose to reconnect to the existing outlet which is in fact pitched though you cannot see it in the picture. While I do appreciate your looking out for us "blind" folk, perhaps next time you could save the sarcasm for your friends.
Chase on May 25, 2018:
Talk about the blind leading the blind. Your vent is undersized at 3". This application requires a short water heater, a minimum of a 12" connector rise, 4" vent, and a new gas cock. Plus you need a wye, not a T where the water heater and furnace connect.
Dan Author on October 03, 2017:
Riley - There is a bit more to installing a tankless than a standard heater. Moving water lines, gas lines, venting and then is the follow up. If there is a breakdown, servicing the unit is a lot more complex. It's not something I would say is for the average homeowner to take on. Thank you for reading and commenting.
furniturez from Washington on August 08, 2012:
Hot water heaters are a must and so are the installation steps... thanks so much!
Mmargie1966 from Gainesville, GA on August 07, 2012:
What a stellar hub, Cre8tor! You made everything look so easy, and I could even understand it! I voted up and awesome. I'm going to share this hub, too.
Dan Reed (author) on August 07, 2012:
@pmorries - LOL! Perhaps water was then the root of all evil...square root of all evil that is.
pmorries from Golden, CO on August 07, 2012:
I read on the internet that the Algebraens sell the dirty water from the old water heater as mineral enhanced bottled water.
Dan Reed (author) on August 07, 2012:
Thank you mizmazda. I'm sure many will choose not to but for those who do, I hope this helps them along the way. Thank you for sharing!
mismazda from a southern georgia peach on August 06, 2012:
Wonderful hub...even though I don't plan on putting in my own hotwater heater....I will be sharing...
Pictures of Different Types of Water Transportation
Source: https://dengarden.com/appliances/How-to-Install-a-New-Hot-Water-Heater
0 Response to "Pictures of Different Types of Water Transportation"
Post a Comment